Podcasting is becoming more and more common among the millennials now. Statistics show that there are over 700,000 active podcasts, around 29 million podcast episodes. There are more adding up to these numbers as time goes by. This increase in the figures is not surprising, though. Podcasts are one of the best ways to get your voice heard by millions out there. It is easy to set-up, and you can record whatever you like, and make it available for people to listen, and even download. If you think you have what it takes to gather an audience, podcasting will take you a long way. Many channels found their stardom because of their podcasts, which include “The American Life,” “Serial,” etc. Podcasting itself is the fun part if you are into it. Setting up the perfect studio is the more tricky part, especially when you are a beginner. That is the sole reason we have prepared the ultimate guide to help you set up the perfect studio for your podcasts.
What You Need
The equipment you are going to need depends on the type of podcasts you want to record. If you don’t already know, there are multiple types of podcasts, which include but are not limited to, interviews, traditional, storytelling, inspirational, etc. Once you figure this out, then you need to look for the most appropriate equipment that will give you the best results. Equipment would again vary from user to user. But the most significant gear includes a computer, microphone, headphones, recording software, audio mixer, and some accessories to improve the overall performance. Now let us look at each one of them in more detail.
Microphone
The next most important thing you need is a microphone. You need to get a decent sounding mic to have a good start in your podcasting career. Deciding which one to buy depends on the environment you will podcast in. If it is a noisy environment, you would need a dynamic microphone, whereas, in a quiet surrounding, you need a condenser microphone. Now let’s look at the best mics for both of these environments.
Blue 1967 Yeti Pro – Condenser
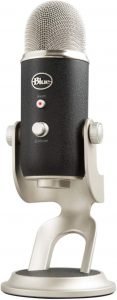
The Blue 1967 Yeti Pro is the most affordable and the highest quality microphone you can get under $250. It sounds exceptionally well in quiet surroundings and gives a high-quality output. Many podcasters recommend this due to the features it offers. Let’s look at a few of them now:
- It is easy to use as it is a plug-and-play USB microphone.
- It comes with a built-in pattern with four polar pattern settings; stereo, omnidirectional, bidirectional, and cardioid.
- It has a maximum recording resolution of 192 kHz/24-bit.
- Easy to carry around as it weighs just 2.2 pounds.
All these features make it an excellent option at such a low price.
RØDE Broadcaster – Condenser
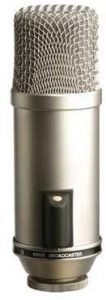
If you are willing to spend a bit more on the microphone, RØDE Broadcaster is the best option for you. RØDE is known for its high-quality products with high-end performance. This microphone is no exception to that. It is a professional level mic and does the job very well in controlled environments. Among many other things, this mic features:
- A built-in pop filter to lessen plosive sounds,
- An on-air indicator LED,
- An HF2 1 inch capsule with a gold plated diaphragm,
- A selectable high-pass filter at 75Hz,
- An ultra-low noise.
All of these features, combined with its low weight of just 1 pound, makes it an ideal but a bit expensive mic for Podcasters.
Shure SM58S – Dynamic
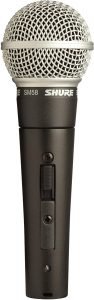
The Shure SM58S is one of the most used microphones out there. It is the best on-stage sounding microphone you can get around $100. It is reasonably well sounding, especially in noisy areas. This mic has many advantages, such as,
- Its frequency response ranges from 50 to 15,000 Hz.
- It has a frequency response specially tailored for vocals.
- It weighs just 0.66 pounds and has a three-pin professional audio connector.
- It also has an on/off switch for your convenience.
This mic has exceptional value on money and is suitable if you have a low budget and a loud environment where you look forward to podcasting.
Electro Voice RE-20 – Dynamic
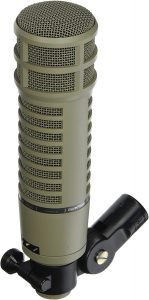
The Electro Voice RE-20 is a professional-quality dynamic cardioid microphone. It is an industry level mic, often used in radio stations. If you’re looking forward to spending a high amount on a microphone, this will set you back around $500 but will deliver the quality above your expectations. This mic has many pros, for example:
- The mic’s frequency response ranges from 45Hz-18kHz.
- It has blast and wind filters that cover each acoustic opening.
- It has an internal element shock-mount which reduces vibration-induced noise.
- It comes with a heavy-duty internal pop filter that reduces proximity effects.
- It has a 3-pin XLR connector.
With all these features combined, the price tag is not too much. If you’re looking to put in a one-time investment and produce high-quality sound, you will not find an all-rounder better than this.
Microphone Accessories
Now that you have the perfect microphone, you need some accessories to enhance the quality of your microphone and help record with ease. There are many accessories to improve the experience, but the significant ones include a boom arm, pop filter, and a shock mount.
Boom Arm
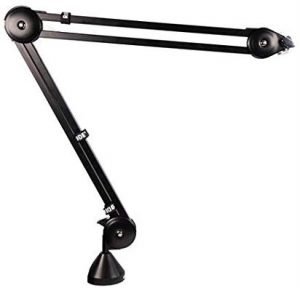
A boom arm is an accessory that is used to carry the mic. You can easily attach the mic to the arm and pull it freely whenever the need arises. These can be drill-mounted or can clip to your desk, whatever suits you. The boom arm you want to get depends on the microphone you are using. However, the most used and highest-rated boom arm is the RODE PSA 1 Swivel Mount, which is available under $30 from Amazon.
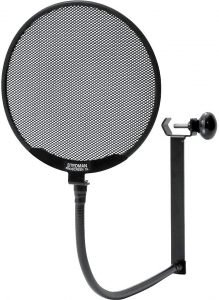
Pop Filter vs. Foam Ball Filter

Now both of these are used for stopping plosives. The foam ball filters cover the mic whereas the pop filters get attached to the mic stand or the shock mount. The significant difference between the two is the price. The foam ball filters are available in a variety of colors and under $10. The Pop Filter, however, costs way more than that, with many going around $100. Foam ball is preferable if you are a beginner as it does an admirable job. If you’re looking to spend more, and have a professional set-up, you can go for the pop filter instead. The Neewar Ball Filter is the best among rivals, and Stedman Corporation ProScreen XL is the most desirable pop filter.
Stedman Corporation Proscreen XL – Black
Shock Mount
A shock mount is used to decrease the sound made by vibrations. It is a handy accessory that can help make the sound quality clearer. Especially if there is a lot of movement in the studio, or if others are using the mic too. So, if the mic rocks a bit during recordings, this will help minimize the noise. The shock mounts solely depend on the mic you’re using, because of the difference in sizes and diameters. Hence, you need to look for the shock stand according to your mic.
Headphones
Headphones are an essential part of the podcast. They help you monitor your audio, which saves you from the trouble of listening to your record afterward and finding annoying background noises later on. You have a complete check on the recording, and hence this results in the perfect podcast to be shared with others. Other than this, these also help you edit more accurately. Headphones give a more precise audio output as compared to computer speakers, which help to modify it more efficiently. Therefore, you must choose the headphones wisely, as they serve a vital role. The best affordable headphones are the Sony MDR7506, whereas the more professional and expensive headphones are the Audio-Technica ATH-M70x.
Sony MDR7506
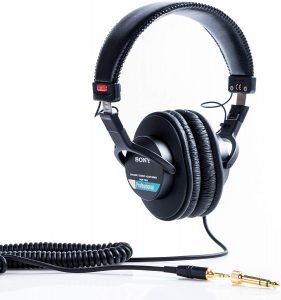
Sony is a renowned company, thanks to its audio products. They have dominated the market with their outstanding products, and the Sony MDR7506 is one of the reasons for the success. Here are some features of these headphones:
- It has neodymium magnets and 40-millimeter drivers which give detailed and powerful sound.
- It has a frequency response that ranges between 10 Hertz to 20 kilohertz.
- It has a closed-ear design for comfort and reduction of external noise interference.
- These are foldable and weigh just 0.5 pounds.
These remarkable headphones are ideal if you are on a budget, but desire a product that delivers high-quality output. These are available around $100 on Amazon.
Audio-Technica ATH-M70x
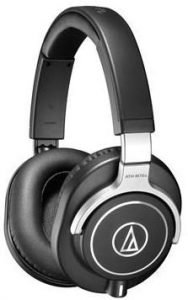
The Audio-Technica ATH-M70x are the best headphones but come with a big price tag. These are professional grade headphones which come with extraordinary features, such as:
- The professional-grade earpads and headband help provide excellent durability and comfort.
- Its fold-flat design helps in space-saving and portability.
- The frequency response ranges from 5-40,000 Hz.
- It performs exceptionally well for noise-isolation.
Due to these features, and the publicity it received by Podcasters and YouTubers, the Audio-Technica ATH-M70x is the best if you are willing to spend up to $300. It is available right now on Amazon, so make sure you get it before the stocks run out!
Mixers and Audio Interface
Pyle PMXU83BT – Mixer
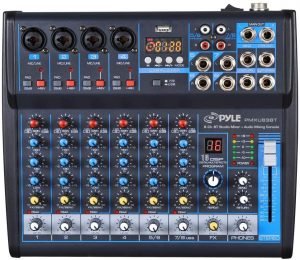
You need a mixer to get the audio into the recording unit or your computer. You connect your mic with the mixer for it to work and record as well. You also have the option to plug some other device into the mixer for it to play audio, for example, smartphone. These give you access to multiple options, such as volume, EQ, and panning. More advanced and professional mixers have way more functionality. The best affordable mixer that is available out there is the Pyle PMXU83BT. Here are a few of its features:
- It has a built-in BlueTooth wireless receiver.
- It can connect directly to the computer and can record sound.
- It can connect and stream audio from external devices.
- It has a USB interface.
- It is easy to understand and use.
- It is ideal for professional studio applications and on-stage performances.
Considering all these features, it is a great buy. However, it is ideal if you are intermediate or a professional. In case you are a beginner, an audio interface will do just fine.
Behringer UMC222 – Audio Interface
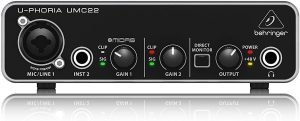
An audio interface is similar to a mixer but has limited functionality. It is the most suitable if you are a beginner and want to podcast by yourself. There are many available out there, but the Behringer UMC22 gets the job done at a significantly lower price. The specifications include:
- A 2×2 USB audio interface to record microphone audios.
- It features a 48 kHz resolution for professional audio output.
- It has a USB port for power and connection.
- It is capable of streaming 2 inputs/2 outputs with ultra-low latency to the computer.
The best part is that it does not make a hole in your wallet. It costs a bit over $50 on Amazon and does its job very well.
Software
Recording and Editing
Now that you know all the hardware necessary for podcasts let’s look at some software that you would need as well. You need a DAW, short for Digital Audio Workstation, to record and edit the audio that your computer receives. There are several softwares available on the internet, with many being free, and some being well over $1000. If you are a beginner and don’t feel like emptying your pockets, Audacity (Windows) is the best option for you. If you are using Apple’s OS, you can go for GarageBand. These are a couple of the best free software. But if you want a more professional one, you can go for the paid ones, which include Logic Pro X by Apple, or Cubase by Steinberg.
Converting Audio Into Transcript
Once you have done everything and your podcast is ready, you would need some software to transform all the audio into a transcript and save it. There are multiple uses for it; for example, you can add the subtitles to the video podcast, and even help to engage a broader audience because of it.
The conversion subscription that Designrr offers is one of the best out there. There are many reasons to subscribe to it, for example,
- It is way cheaper compared to other subscriptions.
- It does the work efficiently and in way less time.
- It is easy to use and learn.
- It has a lot of professional functionality.
- Saves all the data in the cloud so it can be downloaded again whenever needed.
- It allows you to take video screenshots.
- It can easily export data to applications like iBooks, Kindle, and ePub.
Therefore, to help you out in your podcasts, and to convert them into eBooks, this is a software that can help you out, without having to pay loads of money.
BUY IT TODAY
Bonus Equipment
Acoustic Foam Panels

Acoustic foams prevent the sound from bouncing off the walls and back into the mic. Many sensitive mics pick up the noise that bounces off the boundaries of the room, and it gets recorded in the podcast, making it sound as if it was recorded in a bathroom. There are many acoustic foam panels available. The best ones are Foamily Burgundy Acoustic Foam at a lower price and the Auralex Acoustic Foam for someone with a higher budget.

Conclusion
That’s it. These are all the essential equipment you need to get started with the Podcasts. It is the perfect set-up for people on a budget, and for people who are willing to spend more. It is all a matter of self preference. If you are a beginner, consider spending less on equipment and upgrade as you go along! The sooner you start to learn stuff by experience, the more appropriate it would be to spend a fortune setting up the perfect studio. Makes sense, doesn’t it? Make sure you consider everything listed in this blog before you get started to get the best results!